

지난 글에서 HuggingFace Datasets로 데이터를 로딩하고 전처리하는 방법을 다뤘다. 파인튜닝까지 마쳤다면 이제 결과물을 팀과 공유하거나 서비스로 배포할 차례다. 이번 글에서는 HuggingFace Hub를 활용해 모델을 올리고, 모델 카드를 작성하고, 웹 데모 앱을 배포하는 방법을 살펴본다.
HuggingFace Hub란?
HuggingFace Hub는 모델·데이터셋·앱(Spaces)을 호스팅하는 플랫폼이다. 내부적으로 Git + Git LFS 기반이라 git clone / git push로도 조작할 수 있지만, 실제로는 Python 라이브러리 huggingface_hub와 Transformers의 push_to_hub() 메서드를 쓰는 것이 훨씬 편하다.
pip install huggingface_hub인증: 토큰 설정
Hub에 파일을 올리려면 액세스 토큰이 필요하다. huggingface.co/settings/tokens에서 발급할 수 있다.
from huggingface_hub import login

# 방법 1: 인터랙티브 (Colab / 노트북)
login()

# 방법 2: 토큰 직접 전달
login(token="hf_xxxxxxxxxxxxxxxxxxxx")

# 방법 3: 환경변수
# export HUGGING_FACE_HUB_TOKEN="hf_xxxx"
CLI를 쓰는 경우에는 huggingface-cli login을 실행하면 된다. 토큰은 ~/.cache/huggingface/token에 저장되어 이후 모든 API 호출에 자동으로 사용된다.
모델 업로드: push_to_hub()
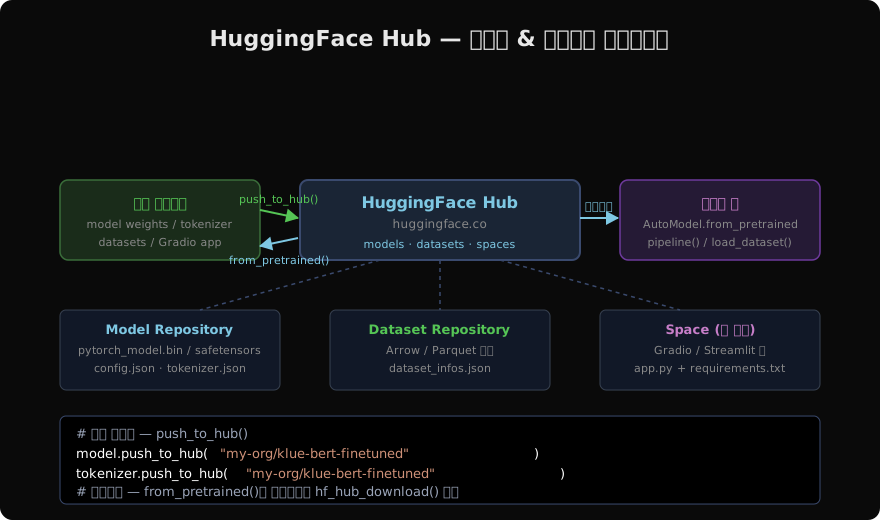
파인튜닝된 모델을 Hub에 올리는 가장 간단한 방법은 push_to_hub()다.
from transformers import AutoModelForSequenceClassification, AutoTokenizer

model     = AutoModelForSequenceClassification.from_pretrained("./my-model")
tokenizer = AutoTokenizer.from_pretrained("./my-model")

# 업로드 — 리포가 없으면 자동 생성
model.push_to_hub("my-username/klue-bert-sentiment")
tokenizer.push_to_hub("my-username/klue-bert-sentiment")
Trainer를 쓰는 경우 TrainingArguments에 push_to_hub=True를 주면 학습 완료 후 자동 업로드된다.
from transformers import TrainingArguments, Trainer

args = TrainingArguments(
    output_dir="./results",
    push_to_hub=True,
    hub_model_id="my-username/klue-bert-sentiment",
)
trainer = Trainer(model=model, args=args, ...)
trainer.train()
trainer.push_to_hub()   # 최종 체크포인트 업로드
파일 다운로드: hf_hub_download / snapshot_download
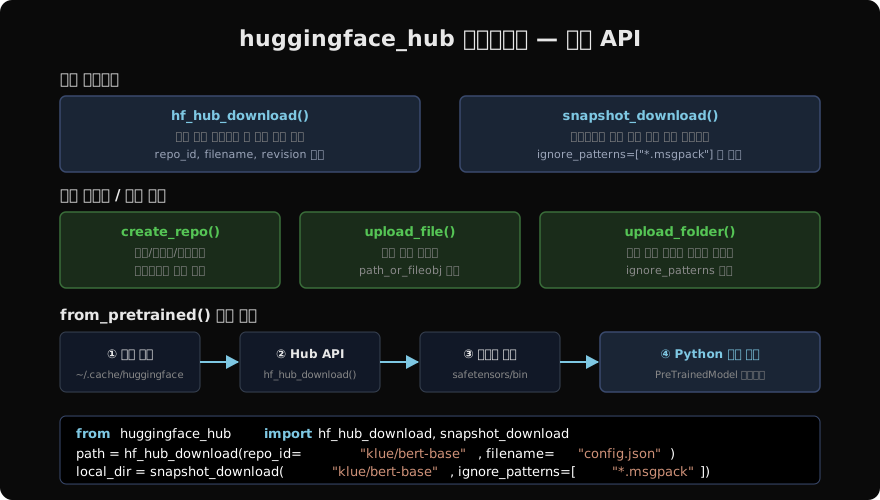
huggingface_hub 라이브러리는 단일 파일 또는 리포 전체를 다운로드하는 저수준 API를 제공한다.
from huggingface_hub import hf_hub_download, snapshot_download

# 단일 파일 — 로컬 캐시 경로 반환
config_path = hf_hub_download(
    repo_id="klue/bert-base",
    filename="config.json"
)
print(config_path)
# ~/.cache/huggingface/hub/models--klue--bert-base/snapshots/.../config.json

# 특정 revision (브랜치 / 커밋 해시)
weights_path = hf_hub_download(
    repo_id="klue/bert-base",
    filename="pytorch_model.bin",
    revision="main"
)

# 리포 전체 다운로드
local_dir = snapshot_download(
    repo_id="klue/bert-base",
    ignore_patterns=["*.msgpack", "flax_model*"]
)
from_pretrained()이 내부적으로 하는 일
AutoModel.from_pretrained("klue/bert-base")를 호출할 때 내부에서는 다음 흐름이 실행된다.
~/.cache/huggingface/hub/에 해당 리포+revision의 파일이 있는지 확인- 없으면
hf_hub_download()로config.json→tokenizer_config.json→ 가중치 파일 순서로 내려받음 config.json을 파싱해 모델 클래스 결정- 가중치를 로드해
PreTrainedModel인스턴스 반환
캐시가 있으면 네트워크 접근 없이 즉시 반환된다. 오프라인 환경에서는 HF_DATASETS_OFFLINE=1 환경변수를 설정하면 캐시만 사용한다.
리포지터리 직접 관리
HfApi 클래스로 리포 생성·파일 업로드·삭제 등을 프로그래밍 방식으로 제어할 수 있다.
from huggingface_hub import HfApi

api = HfApi()

# 리포 생성
api.create_repo(
    repo_id="my-username/my-model",
    repo_type="model",       # "dataset" | "space"
    private=True
)

# 단일 파일 업로드
api.upload_file(
    path_or_fileobj="./results/pytorch_model.bin",
    path_in_repo="pytorch_model.bin",
    repo_id="my-username/my-model"
)

# 폴더 통째로 업로드
api.upload_folder(
    folder_path="./results",
    repo_id="my-username/my-model",
    ignore_patterns=["*.log", "*.tmp"]
)

# 파일 목록 조회
files = api.list_repo_files("klue/bert-base")
print(list(files))
모델 카드 (README.md)
Hub 리포에 README.md를 올리면 자동으로 모델 카드로 표시된다. 프론트매터에 메타데이터를 작성하면 태스크·언어·라이선스 등이 검색 필터에 반영된다.
---
language:
  - ko
license: apache-2.0
tags:
  - text-classification
  - klue
datasets:
  - klue
metrics:
  - accuracy
---
# KLUE BERT Sentiment
KLUE 데이터셋으로 파인튜닝한 한국어 감성 분류 모델입니다.
## 사용법
```python
from transformers import pipeline
clf = pipeline("text-classification",
model="my-username/klue-bert-sentiment")
print(clf("이 영화 정말 재밌었어요"))성능
| 데이터셋 | Accuracy |
|---|---|
| KLUE-TC | 87.3% |
`huggingface_hub`의 `ModelCard` 클래스를 쓰면 프로그래밍 방식으로 카드를 생성할 수도 있다.

```python
from huggingface_hub import ModelCard

card = ModelCard.load("my-username/klue-bert-sentiment")
print(card.data.language)   # ['ko']

# 카드 수정 후 저장
card.text += "\n\n## 업데이트\n- 2026-05-28 최초 공개"
card.push_to_hub("my-username/klue-bert-sentiment")
Spaces: 웹 데모 배포
Spaces는 Gradio 또는 Streamlit 앱을 허브에서 바로 실행할 수 있는 무료 호스팅 환경이다.
Gradio 앱 예제
# app.py
import gradio as gr
from transformers import pipeline

clf = pipeline("text-classification",
               model="my-username/klue-bert-sentiment")

def predict(text):
    result = clf(text)[0]
    return f"{result['label']} ({result['score']:.2%})"

demo = gr.Interface(
    fn=predict,
    inputs=gr.Textbox(placeholder="한국어 텍스트를 입력하세요"),
    outputs="text",
    title="한국어 감성 분석"
)
demo.launch()
Spaces 리포의 구조는 다음과 같다.
my-username/klue-sentiment-demo/
├── app.py
├── requirements.txt
└── README.md   ← YAML 헤더에 sdk: gradio 명시
README.md 프론트매터에 sdk: gradio(또는 streamlit)를 지정하면 Hub가 자동으로 환경을 구성하고 앱을 실행한다.
---
title: 한국어 감성 분석 데모
emoji: 🎭
colorFrom: blue
colorTo: green
sdk: gradio
sdk_version: "4.0"
app_file: app.py
---
Spaces 업로드
api = HfApi()

# Space 생성
api.create_repo(
    repo_id="my-username/klue-sentiment-demo",
    repo_type="space",
    space_sdk="gradio"
)

# 앱 파일 업로드
api.upload_folder(
    folder_path="./demo",
    repo_id="my-username/klue-sentiment-demo",
    repo_type="space"
)
유용한 유틸리티
from huggingface_hub import list_models, model_info

# 허브에서 모델 검색
korean_models = list_models(language="ko", task="text-classification")
for m in korean_models:
    print(m.modelId, m.downloads)

# 특정 모델 정보 조회
info = model_info("klue/bert-base")
print(info.sha)          # 최신 커밋 해시
print(info.card_data)    # 모델 카드 메타데이터
print(info.siblings)     # 파일 목록
정리
| 작업 | API |
|---|---|
| 단일 파일 다운로드 | hf_hub_download(repo_id, filename) |
| 리포 전체 다운로드 | snapshot_download(repo_id) |
| 모델/토크나이저 업로드 | model.push_to_hub("user/repo") |
| 리포 생성 | HfApi().create_repo(repo_id, repo_type) |
| 폴더 업로드 | HfApi().upload_folder(folder_path, repo_id) |
| Spaces 배포 | create_repo(..., repo_type="space") |
다음 글에서는 Anthropic이 직접 개발한 Anthropic SDK로 Claude API를 호출하는 방법을 다룬다. 스트리밍, 도구 사용, 비전, 프롬프트 캐싱 등 Claude만의 고급 기능을 실전 코드로 살펴볼 예정이다.
지난 글: HuggingFace Datasets로 데이터 관리하기
다음 글: Anthropic SDK로 Claude API 활용하기
읽어주셔서 감사합니다. 😊